Happy New Year!
Here in Texas, Winter weather is ...well....weird. Last week, it was rainy and 40 degrees....today it was beautiful, sunny, and 80 degrees! It was a perfect day to get outside and weed the yard and garden. Unfortunately, our Salad Table and veggie garden took a hit from the freezing temperatures we had earlier this year and the back-and-forth hot-cold stuff just confused all of my plants. The carrots, however, made it and we harvested them today! My son was so excited!!
 |
| Our carrot crop on 12/31/11! |

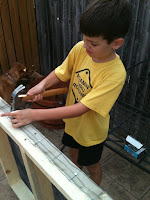
We have so enjoyed our Salad Table (and our container plants)! I first saw the Salad Table idea at the San Antonio Stock Show in 2010 (The Texas Agriculture group always has a great display and they offer awesome tips!). I love that the table is accesible for wheelchair-bound folks (my Dad is an amputee, so I notice these things) and those who have a hard-time bending. It also keeps pests (like our dirt-loving dog, Layla) out and it can be moved around too.
 |
| 08/21/11 |
When I purchased our first home this past Spring, it didn't take long before my son and I started our garden project. We built the table in a day and did the planting the next. We used the
awesome tutorial and plans from the Grow It Eat It program at the University of Maryland website. Our 105 degree Summer days didn't help much, but we had a successful first run especially after I installed a drip irrigation system with a timer...easy and really inexpensive!
 |
12/02/11 So, this is what broccoli
looks like outside of the produce section! |
 |
| 10/17/11 Green Beans! |
 |
08/22/11 Our window box
of carrot seeds |
 |
| 12/02/11 Our tomatoes |
In addition to the Salad Table, we also planted tomatoes in various containers and baby carrots in a window box on the fence.
 |
| Tomato plant and cage in a shopping bag |
The absolute best tomato plant grew in a recyclable bag from H.E.B. (our local grocery chain)....you know the big bags you buy for $1?1? Simply cut some drainage holes in the bottom, fold the bag down a little, and fill with dirt and a seedling! The bag can be stored folded for the next season. And since, they come in a variety of colors and designs, you could make a themed garden!
We were so sad when the freeze took most of our veggies out...but we are not defeated because we are already planning our SPRING GARDEN! I'll keep you posted.....and just look at these carrots!
 |
| They grew in all shapes and sizes! |


 We have so enjoyed our Salad Table (and our container plants)! I first saw the Salad Table idea at the San Antonio Stock Show in 2010 (The Texas Agriculture group always has a great display and they offer awesome tips!). I love that the table is accesible for wheelchair-bound folks (my Dad is an amputee, so I notice these things) and those who have a hard-time bending. It also keeps pests (like our dirt-loving dog, Layla) out and it can be moved around too.